Photography - Northern Lights
From: http://www.davemorrowphotography.com/2014/10/how-to-photograph-northern-lights.html
& http://fullsuitcase.com/photograph-northern-lights-beginners/
Preset Your Focus Point During the Day
It’s much easier to focus during the day than at night, for both you and your camera’s autofocus software.
Since focusing is one of the hardest parts of night / low light photography, getting this step out of the way during the daytime is always best practice.
Follow these easy steps to get started:
1. Set up your camera during the day with the lens you will be using to take your night / low light photos. You can do this at your house, or anywhere else that’s easy, it doesn’t have to be at the location where you plan on taking your night photos.
2. Adjust your lens to focus at infinity, or at a far away horizon. I always like to use my camera’s Live View Mode, zoomed in, and focus on the furthest horizon in my composition. This will ensure that you’ve focused at infinity. You can also focus by looking through your camera’s view finder. This works very well too.
3. Next manually make the final adjustments if / as required using the focus ring. I find that Auto Focus usually does very well during the day, but sometimes needs manual input to nail down the final focus in low light.
4. Take some more practice shots at an aperture of f/8 – f/11 and make sure the entire photo is in focus. If it isn’t focused, repeat Step 2 and Step 3.
5. Now your lens is focused at infinity.
6. Using a permanent marker, mark both the focus ring, and the barrel of the lens (non-rotating part of lens). Tape works as well, but may fall off over time.
This is a reference point that you will be able to use when returning to shoot at night or in low light. I’ve personally marked my lens using a silver Sharpie, allowing me to see the mark at night without using a headlamp or light.
1. Set your camera focus to infinity
Setting focus is probably the most challenging step of night photography, since your camera will not focus well in the dark. If you don’t do this right, you won’t get sharp pictures.
How to set your camera to focus to infinity? In human language, it’s basically making sure that your pictures are sharp at the far horizon. It’s best to do this during the day. Select manual mode on your lens, focus to infinity, adjust as needed and mark your lens at the right place. You can use permanent marker, silver sharpie or tape for it. When you’re outside at night, all you need to do is set your lens to the right position.
If you couldn’t do this during the day, try looking for a brighter point (a house or a lit road in the distance) in the area you are and focus your camera sharp on it. In the worst case, you might try using your flash light to illuminate the point as far from you as possible and focus on it. Make sure you don’t turn the lens after doing this, reframe for the Northern Lights and shoot.
2. Metering mode
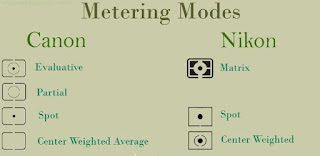
Use the following metering mode for Northern Lights photography: Evaluative Metering for Canon cameras or Matrix metering for Nikon.

3. Wide aperture
Set your camera to Manual Mode for Northern Lights photography (M on most cameras) and make sure you set the aperture as wide as possible. So at 2.8 if you have a f2.8 lens or at f4 if you have a f4 lens.
4. Exposure time
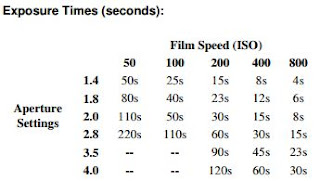
If aurora moves slowly, try a 12-20 second exposure. For very vague auroras you might even need 20-25 seconds. If aurora moves fast, however, 5-10 seconds might be more than enough.

5. What ISO value to use to photograph auroras
Depending on how bright auroras are, you might need to adjust your camera’s ISO settings. Remember: the higher the ISO, the bigger chance of ‘grain’ in your picture. Try shooting at ISO 800 if auroras are very bright. You may need to increase ISO to 1,600-3,200 or even more if it’s really dark.
6. Best white balance settings for Northern Lights photography
You’re probably not shooting in RAW as a beginner (neither do I, to tell you the truth), so you want to get the colours as close to reality as possible straight from the camera. You can use Automatic white balance mode and see what it gives. I found that setting white balance to Custom mode and choosing Kelvin values of 2,800-4,000 worked best for me. Or shooting in RAW mode!!!
1. Start out shooting with an ISO of 400-800 and take a practice shot.
2. After doing so, if your practice shot wasn’t bright enough, increase your ISO to approximately 1200 and take a practice shot.
3. If the photo still isn’t bright enough, continue to increase your ISO until it is. I usually shoot in the ISO range of 800-4000.
Check histogram, and decide...
Camera Settings: 10 Seconds, f/2.8, ISO2500 - Overexposure
Camera Settings: 10 Seconds, f/2.8, ISO2000 - Correct Exposure
Camera Settings: 10 Seconds, f/2.8, ISO1000 - Optimal Exposure
Fast guide!!!
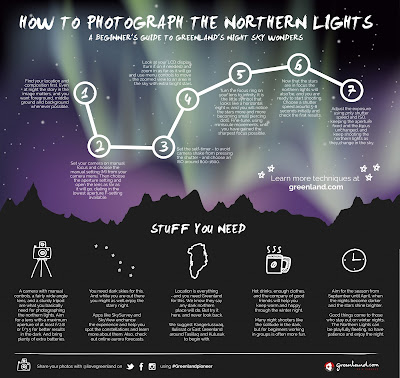
1. Find your location and composition first. Even at night the story in the image matters, and you want foreground, middle ground and background whenever possible.
2. Set your camera on manual focus and choose the manual setting (M) from your camera menu. Then choose the aperture setting and open the lenses as far as it will go, dialing in lowest aperture F-setting available.
3. Set the self-timer - to avoid camera shake from pressing the shutter - and choose an ISO around 800-1600.
4. Look at your LCD display (turn it on if needed) and zoom in as far as it will go and use menu controls to move the zoomed view to an area in the sky with extra bright stars.
5. Turn the focus ring on your lens to infinity. It is the little symbol that looks like a horizontal eight, and you will notice the stars more and more becoming small piercing dots. Fine-tune, using miniscule movements, until you have gained the sharpest focus possible,
6. Now that the stars are in focus the northern lights will also be, and you are ready to start shooting. Choose a shutter speed around 5-8 seconds initially and check the first results.
7. Adjust the exposure using only shutter speed and ISO, keeping the aperture fixed and the focus unchanged, and keep shooting the northern lights as they change in the sky.


0 comentarios:
Post a Comment